-
"How finished an artefact is is an important indicator of its relationship to the world: not just an indication of where it is in its lifecycle, but also one that explains how it should be understood, and that opens a dialogue between the observer and the artefact." Me, on Pulse Laser, talking about unfinished states as conversation tools, amongst other things.
-
"Virgil is singing arms and a man". I must admit, I prefer "the man", but this is lovely nontheless.
-
"I’ve always been curious about which drummers use a click track and which don’t, so I thought it might be fun to try to build a click track detector using the Echo Nest remix SDK." Analysing tempo fluctuation on a variety of popular recordings to find out who uses a click track; as you might have guessed, Ringo and John Bonham didn't.
-
Finally, a decent video of Abel. Ignore the first round, where he gets hammered, and concentrate on the second two: he negates Sagat's ranged game by getting in close, throwing in some careful EX scissor kicks, and massive abuse of linking a juggle into the aerial grab throw.
-
Some nice tips in here, mainly about blocking access to things and security.
-
David Hobby goes to Cern, and has a ball. Also: takes some nice portraits.
-
Useful tutorial on building Pagination, that goes beyond the Pagination library and points out what you need to be doing with the Model, too.
-
Bandcamp add an automatic way to generate one-time use download codes for music – so bands can promote singles and the like. And then: they add automatic Moo Minicard generation to the mix. Bloody brilliant, and definitely The Right Way To Do Things.
-
"where dreams become heart attacks" – photographs of revolting, calorie-drenched food "experiments".
-
"One [memory] always stuck with me was him showing a moody, uplit black-and-white press portrait of Richard Meier in the cliché black-turtleneck and severe glasses in front of venetian blinds – eyes directed up and away in search of the future – very fountainhead. Kaplicky rumbled: “This is not design”. He pointed at me to click the slide carousel forward. An image of a carpark full of Boeing employees, from design engineers to HR to office cleaners in 777 project t-shirts waving at the camera. Kaplicky, now beaming, crookedly: “This. This is design.”" Sounds about right to me.
-
"Multiplayer Design Lead Tyson Green checked a week ago in with a lengthy explanation of the melee system in Halo 3, how it’s different from Halo 2’s what worked about both versions, what didn’t work and how it’s being addressed by the auto update. here's a reminder of what he explained." Via Offworld, this frankly excellent explanation of a Halo 3 patch from early 2008, explaining the problems latency brough to melee combat, and why Bungie implemented their solutions as they did. Clear, educational, and it feels like the right answer. More writing like this, please, games industry!
-
Playground for Google's Ajax APIs. Well implemented, and very useful.
-
"Isla Lyddle End lies on the far east of the British Archipelago. It is the largest of the eastern islands in what was once the continuous land mass known as Hornbyshire. Isla Lyddle End celebrates the Golden Jubilee of The Grand Iman of Britain HH Patel bin Windsor with a minaret clock tower, constructed of hard-pack, molded synthetic carbon nodules in full compliance with the Rock and Soil Conservation Act of 2038." Julian's Lyddle End 2050 entry is excellent.
-
Gosh, this is beautiful. I watched it, and the world stopped for a moment.
-
"Teams from around the globe have analyzed figures and come up with a secret formula for App Store success. I share these findings today, ABSOLUTELY FREE. Success is made up of: a FLASHLIGHT…. and DIRTY WET FART SOUNDS!!! Tweetie is the only app that bundles together these two incredible features FOR THE VERY FIRST TIME." Amazing. I must get this!
-
You'll need to sign up for Issuu to download it, but basically: it's a zine, it's aimed at men, so it's a men's zine, I guess. Some nice spreads, a consistent tone, and a hand-drawn map. Not ironic, just full of things.
-
"I mentioned I’ve learned some rules of how database apps change over time, now that I’ve done a few dozen. They are:" Some interesting thoughts on how cruft builds up over time in database-backed web apps; I can't say I disagree entirely.
-
"Imagine it: instead of text adventures and MUDs being designed to entertain MIT students and 23-year old computer engineers, they fall into the hands of bored housewives and teenage girls… This time there are romantic text adventures, digital doll's houses, dating games. Card deck games where you collect friends, or Versace. The trend continues and the licences that get picked up are not action movies, but those of popular soap operas: Not just hot teenage stuff like 90210, but Guiding Light, Days Of Our Lives, and One Life To Live. This is a games industry completely different to our own, and yet somehow… plausible." Jim Rossignol on the soap-as-game.
-
Leonard Richardson's talk from QCon, about REST, his work on Canonical's Launchpad and its web service, and some useful history for anyone wanting to contextualise web services as part of the web.
-
"Whiskey Media provides fully structured data APIs for the following: Giant Bomb (games) Comic Vine (comics) Anime Vice (anime/manga)". This is a really good page for both explaining what you can and can't do, and explaining what the damn thing is. Wonder how good the data is?
-
"Have you ever wanted to sink your hooks into a gaming database full of release dates, artwork, games, platforms, and other sorts of related data? I'm going to guess that, for the bulk of you, the answer's probably no. But if you're out there wondering what to do next with your developer-savvy smarts, you've got another big source to pull data from. The Giant Bomb API is now available for non-commercial use." Giant Bomb really are doing some pretty interesting stuff, alongside their more traditional content.
-
"Customers seem to respond better to the Sims than all the adventure games ever made combined together. Then there are Bejeweled and Peggle and other game games. Who needs a stink’n story? I prefer making interactive stories." The writer of "Dangerous High School Girls in Trouble", interviewed on RPS, drops an interesting one.
-
"The baseline grid. Oh yes, the baseline grid. Let's be honest this is the sort of thing you know you need to know about. And you do know about, you know, sort of. But. Do you really know about it? Of course you do if you work on a magazine or a newspaper, but when was the last time you used one? I almost re-taught myself how to use a baseline grid. I certainly re-read all about it and it pretty much saved my life." Ben, on the details of The Paper. Good stuff in here.
-
"This is by no means an exhaustive list, just a start. In each of these you’ll find other resources to help you dig deeper." Which, right now, is what I need. For a former front-end-dev, I'm a bit behind the curve.
-
"So we’ve progressed now from having just a Registry key entry, to having an executable, to having a randomly-named executable, to having an executable which is shuffled around a little bit on each machine, to one that’s encrypted– really more just obfuscated– to an executable that doesn’t even run as an executable. It runs merely as a series of threads." Fascinating interview with a smart guy, who at one point in his life, did some bad (if not entirely unethical) work.
-
"I do think that during the coming years we will continue to try to bridge the gap between simulated musicianship and real musicianship. That said, the path there is not obvious: As the interactivity moves closer to real instrumental performance, the complexity/difficulty explodes rapidly. The challenge is to move along this axis in sufficiently tiny increments, so that the experience remains accessible and compelling for many millions of people. It’s a hard, hard problem. But that’s part of what makes it fun to work on." There is loads in this interview that is awesome; it was hard to choose a quotation. Rigopulos is super-smart.
-
"On June 17th, every year, the family goes through a private ritual: we photograph ourselves to stop, for a fleeting moment, the arrow of time passing by." Perfectly executed.
-
"The Bop It commands are called out in different tones. These tones differ from version to version as well. In Bop It Blast, distinct tones are employed by both male and female speakers." I did not know that.
-
"A couple of other examples of this kind of thing we like, are the bookish experimentations of B.S. Johnson, whose second novel Alberto Angelo contains both stream-of-conciousness marginalia, and cut-through pages enabling the reader to see ahead – possibly the most radical act I know in experimental books." Yes! And which I bang on about interminably. I love this stuff.
-
"…most public objects – and certainly all municipal objects – should offer APIs. Furthermore, specifically with regard to public infrastructures like transit systems, I believe that this should be a matter of explicit government policy. What’s a public object? A sidewalk. A building facade. A parking meter. Any discrete object in the common spatial domain, intended for the use and enjoyment of the general public. Any artifact located in or bounding upon public rights-of-way. Any discrete object which is de facto shared by and accessible to the public, regardless of its ownership or original intention. How’s that for starters?"
-
Better than GetBundle, apparently – hunts down unofficial bundles on github and the like, as well. Nifty.
-
"What a wonderful idea," Jennifer noted. "We never get to see the people who make the games." Michael Abbott is talking about LittleBigPlanet.
-
Leanoard rounds up his favourite DS homebrew games. Some good stuff in here that I didn't know of.
-
"This is just one of many examples that show you can participate in online community without having to pretend to be something you’re not. In fact, participating with authenticity is not just morally good, it’s measurably more effective."
-
Powazek is right; this is definitely smart advertising, and full props to EA/W+K for just taking the credit and not trying to make it "viral"; it'll do that anyway. Although: it really is a glitch, you know.
-
Detailed write-up from Alice of a presentation from Turbine – the stuff on where to draw boundaries between game and web is really, really interesting.
-
Oh god, pets now have talent trees. Why does the game get complex just as I've begun?
-
"Making games is easy! Well, okay, maybe it's actually kind of hard, but starting out is easy at least! Especially when you have Kongregate's shootorials (shooting tutorials) to guide you through the process." Tutorial on making a 2D shooter in CS3. Awesome!
-
"So to recap, we have scraped some data from a wikipedia page into a Google spreadsheet using the =importHTML formula, published a handful of rows from the table as CSV, consumed the CSV in a Yahoo pipe and created a geocoded KML feed from it, and then displayed it in a Yahoo map." Wow, etc.
-
"The dataspace of the well-tempered environment will soon be invaded by logos, credits, banners and offers. The financial temptations will, I suspect, be too hard to resist." Loads of excellent stuff in here besides this, though. Can't recommend enough.
-
This is wonderful "wilfully fictional" advertising: an affectionate pastiche of the geek's love of unboxing videos, with some wish-fulfillment as to what unboxing ought to really look like.
-
"And if all videogames could ever aspire to was being big, dumb, blockbusting escapism, does that even matter? Hasn’t every generation that ever lived created make-believe worlds to climb into and take refuge? I don’t know. I don’t know. I just wish we’d asked each other the questions a bit more fifty years ago." Too many quotations to choose from in this; wonderful writing from Simon Parkin.
-
"The upcoming presidential election has seen record fund-raising by the candidates and a host of new donors. Now we want our users to be able to analyze and reuse some of the data we’ve been looking at while reporting on the campaign."
-
"Do you really want them campaigning in your hobby? I don’t."
-
Fascinating to see such emphasis on the manufacturing process, accompanied with wonderful footage of factories that takes me straight back to the documentary sections in Playschool and Sesame Street. The milling sequence is beautiful. (The product isn't bad, either, but I'm mainly interested in raising awareness of mass-production in an age of coming scarcity).
-
"Alternate movie posters about film brand integration." Beautiful, typographically speaking, and definitely honest.
Stripes and Surrealism: Playing with the Moo API
05 October 2008
Making things is fun. It’s satisfying to watch things spring forth from nothing, made by your own hands.
The greater the gap between your own capabilities (or your perception of them) and your output, the more satisfying – not to mention bemusing – the process is. That’s why Moo‘s public API is so exciting – using nothing but code, you can create real, physical, things. Imagine that! Objects you can hold that sprung forth out of bits and bytes.
I mentioned last week that I’d worked on extending Ruminant, a Ruby library for interfacing with Moo’s API, to also handle the creation of stickers. I wasn’t doing so purely out of generosity, though; I had a project up my sleeve that I wanted to work on.
I can now show you the results of that project. Why only now? Because now, I have the physical products in my hands. I think it’s really important with something like the Moo API that you only talk about what you’ve made when it’s actually real – no showing off code and saying “oh, they’ll be here soon“. You’ve got to make the things.
Anyhow: now I can tell you what I was up to.
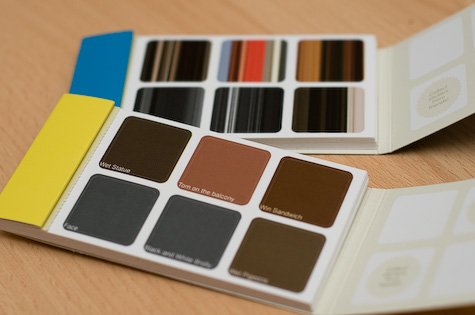
These are two books of stickers, made from of my most recent photos on Flickr. They’re built by taking data from the Flickr API, processing it on my computer, uploading it to the web, and sending it to Moo’s API. This is a single shell command. You fill out a configuration file with the important details – such as your API keys for both Moo and Flickr – and run the file. A short while later, you’ll be asked to pay for your stickers, and off you go.
The fun part of this isn’t the whole one-step thing; it’s what goes on when we process the images. We don’t just print them straight, you see.
Another short aside: making real things out of code is fun because you don’t think it should be possible, and image-processing is actually similarly entertaining, just because it feels like it should be harder than it is. Most “easy” programming comes down to processing text in, and text out. Images seem like they should be harder. In fact, images are now much easier than they used to be thanks to things like GD and ImageMagick. I had a lot of fun playing with RMagick, and it wasn’t difficult at all.
So, what did I make?

The first are what I called Dadaist Photographs. Moo stickers are small; it’s quite hard to see a proper photo on their small dimensions. So why not make something at once very vague, and yet also entirely precise? That’s what these are. The background of the image is the average colour of the photo, determined by summing the red, green, and blue values of each pixel in the image, and then dividing each of those by the area of the image to get the average red, green, and blue values – and then making a colour out of those. In the foreground, we super-impose the title of the photograph in text. This is, as you can tell, somewhat silly. But! It’s a hyper-realistic single-pixel photograph, and ideal for Moo’s stickers. (A quick note – I didn’t quite add enough padding to the text on these. I’ve learned my lesson for next time).
Whilst I was working on that, I had another fun idea. It turned out to be just as easy to build, as it resuses most of the same code as the Dadaist Photographs. This let me abstract lots of things out, and at the same time learn how to write slightly tidier object-oriented Ruby. Anyhow, a short while later, and we had these:
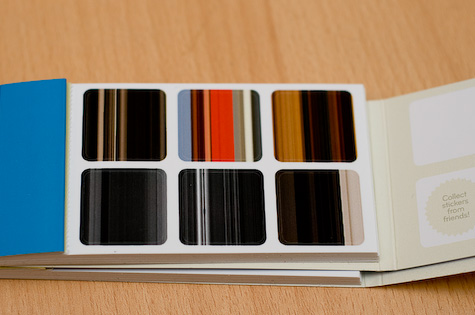
These are less silly, and to my mind more beautiful – they render wonderfully on paper. They are very simple to make. First, we squash the photo down to being a 500×500 square. Then, we take the middle row of pixels in the image, and replace every row of pixels in the image with the middle row. The net result is essentially a “stretched” image, based on a single row from the image. RMagick made this very easy. Like I said, I think the results are very beautiful, and it’s amazing how easily identifiable they all are.
I wrote these by first creating the image processing code. That’s the stuff I was least familiar with, and took the longest to get my head around. Once that was done, it was relatively easy to bolt proper Flickr API import on (thanks to the Net::Flickr gem), and subsequently take my processed images and throw them directly at Moo’s API, thanks to Ruminant. A small amount of tidying, abstraction, and the creation of simple config files later, and we were done.
The only slight catch is that Moo need to get pictures from the public web. I’m running my script locally, because it’s quite processor/memory intensive, so the script SFTPs the pictures to a destination of your choosing before sending them to Moo.
But that’s it. It’s one click. It works most of the time (but with 90 images sometimes chokes a little; still, it’s not hard to salvage that by generating the XML for the order yourself). Because of the processor/memory overhead on rendering the images, I haven’t put this online as a web tool – I’m still thinking if there’s an easy way to do that. This could end up on EC2 one day.
What I’ve done instead is to put it on github, so you can at least see the code to learn from it, and, if you want, download and run your own copy. (If you’re not sure what to do: install git, and then click “clone” on the github page to get the command to type to clone the repository), I can’t guarantee it’ll work on your machine, and I can’t offer any support to help you get it running, but I hope you have fun with it regardless.
So there you go. First, an idea; then, the physical product; finally, the code that makes it all work. This doesn’t serve much real purpose, I’ll admit, but it was a fun making project, and it’s hugely satisfying to see how easy it is to make things out of pictures and paper with code, starting with a simple idea.
I’m not sure if I’ll take this any further – it stands alone quite nicely – but for starters, I’m going to see if I can extend Ruminant to handle other product types – though for various reasons, that might take a little while. If I do anything with it, you’ll hear it here first. In the meantime, I hope this serves as a little inspiration for how easy it is to make fun stuff with Moo, and perhaps that my silly, surreal stickers raised a smile.
Ruminant 0.9.5: making Moo Stickers in Ruby
26 September 2008
Last night, I took a look at James Darling‘s Ruminant library for Ruby. It’s a little Ruby library that lets you assembled designs and orders and send them to the Moo API for printing. It’s really nicely designed, but it’s only in the very early stages of development; it only supported creation of Minicards.
For various reasons, I’m looking at creating stickers through the API, and decided that it only seemed right to add sticker support to Ruminant.
As of last night, I’ve done exactly that. This is in part down to the joy that is GitHub. I forked James’ original code, and started work on my own Ruminant fork. I’ve added support for stickers, and have issued a pull request so that hopefully it’ll get merged back into James’ branch.
To install it, you’ll need Hpricot installed (sudo gem install hpricot). Once you’ve done that, you can install it as a gem directly from my Github code. First, add Github to the list of sources rubygems supports:
gem sources -a http://gems.github.com
and then install my gem:
sudo gem install infovore-ruminant
and follow the instructions in the README.
More to come, along these lines…
-
"I'm passionate about this because I'm building the camera I've always wanted to shoot with," he says. "When my grandkids and great-grandkids look back, they're going to say I was a camera builder. I did handgrips and then goggles and then sunglasses to prepare myself. But cameras are magic." Fantastic article about Jim Jannard and his Red digital movie-camera business.
-
Brilliant, brilliant little advert.
-
"VideoGamesHero brings you homebrew action at it's best – offering lasting fun and challenging action with over 65 Songs, 5 Game modes, Motion Card and Guitar Grip support, there is something for everyone!" Homebrew Harmonix-style rhythm action game for the ds. Awesome.
-
"In this extensive interview, Yasuhara outlines his carefully constructed theories of fun and game design, including the differences between American and Japanese audiences, with illustrated documents." Lots of nice things in here, including a section on "tidying up".
-
"APIdock is a web app that provides a rich and usable interface for searching, perusing and improving the documentation of projects that are included in the app." Handy.
-
"I think the role of the architecture diagram, user flow, and wireframe belongs very much after the fact, after we’ve sketched and prototyped an experience. Those are tools to document what has been agreed through sketching and prototyping. They are not the best means for solving challenging design problems." That seems like a good way of putting it.
-
"In this template you'll find shared layers (masters) for a title page, wireframe, wireframe/storyboard hybrid, simple storyboard, and storyboard with notes. Column guides and a regular grid make it easy to use and keep your layout tight." Nice .graffle templates for UX designers.
-
Timelapse, merged photographs of videogames. Beautiful, especially Tempest.
Making bridges talk
28 February 2008
I’ve written before about how wonderful Twitter can be as a messaging bus for physical objects. The idea of overhearing machines talking about what they’re doing is, to my mind, quite delightful.
So when I found an untapped data source for such an object, I thought it was worth having a poke. Half an hour of scripting later and Tower Bridge was on Twitter. It tells you when it’s opening and closing, what vessel is passing through, and which way that vessel is going. The times are determined by taking the scheduled time for the “lift” and subtracting five minutes for the opening, and adding five minutes for closing – the official site suggests that, at rush hour, lifts should take five minutes to open and close tops.
That’s it, really; it’s just a simple case of scraping some data and outputting it. It’s not a hugely frequent event, so won’t disturb you very much; if anything, it’s just a little insight into the heartbeat of the Thames.
As a note on its design: it’s very important to me that the bridge should talk in the first person. Whilst I’m just processing publicly available data on its behalf, Twitter is a public medium for individuals; I felt it only right that if I was going to make an object blog, the object should express something of a personality, even if it’s wrapped up in an inanimate object describing itself as “I”.
And, if you want proof that it works… how about this:

I’d set the server up yesterday; suddenly, this morning, it twittered into life, and we charged out of the office around the corner to the bridge, where the MV Dixie Queen was getting into position for its lift. As it went through, I took a picture. That was a very satisfying moment.
(Thanks to Tom for helping me bash a crontab and a few other server-shaped things into shape. If you’re interested in the technology, which is really not very relevant, it’s about thirty lines of Ruby that glues together a combination of: wget, Hpricot, John Nunemaker’s Twitter gem, and cron.)
Updated June 22nd 2011 with the new URL for the bot, following this whole series of events.