-
"In this context, Google+ is not the company’s most strategic project. That distinction goes to Glass, to the self-driving cars, and to Google Maps, Street View, and Earth—Google’s model of the real, physical world. Maybe in twenty years we’ll think of Google primarily as a vision company—augmenting our vision, helping us share it—and, oh wow, did you realize they once, long ago, sold ads?" This is good. I like the distinction between pictures and vision a lot.
-
""And thus ends all that I doubt I shall ever be able to do with my own eyes in the keeping of my journal, I being not able to do it any longer, having done now so long as to undo my eyes almost every time that I take a pen in my hand; and, therefore, whatever comes of it, I must forbear: and, therefore, resolve, from this time forward, to have it kept by my people in long-hand, and must therefore be contented to set down no more than is fit for them and all the world to know; or, if there be any thing, which cannot be much, now my amours to Deb. are past, and my eyes hindering me in almost all other pleasures, I must endeavour to keep a margin in my book open, to add, here and there, a note in short-hand with my own hand." Well put. Well done, Sam. Well done, Phil.
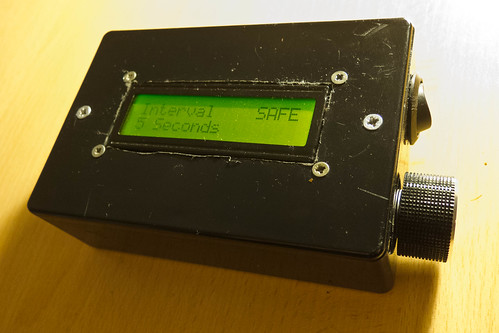
The black box above is an intervalometer to work with Nikon cameras (specifically, any cameras that work with the cheap ML-L3 remote). It has two external controls: a power switch and a knob. You rotate the knob to choose the interval period on the screen, and click it in to arm the intervalometer. Clicking it again and briefly holding it until the screen lights will disable it.
Which sounds simple enough, I suppose. I mean, it’s simple to explain. But when I began, I wasn’t even sure if I’d be able to make this – which was part of the adventure.
My commit messages tell me I’ve been working on it for over a year. It’s not, to be honest, a year-long project; it’s just how it came about, scraped together in moments between work, and I wanted to write some notes on the project – both what it is, and what I learned from it.
The Design
Like many of my technically-savvy peers, I had an Arduino in a desk drawer. I’d used it for more than just making an LED blink – a few little experiments in serial communication – but I’d not exactly exploited its full capabilities.
One day, I had a thought: I wanted to experiment with time-lapse photography, and had a small IR remote for my camera. Perhaps I could make something computer-controller to enable this? Not a full-size computer, that’d be ridiculous. But I could perhaps make something with a small microcontroller – like my Arduino – wired into a spare remote, firing regularly.
That smelled like it was within my reach: a little user interface and a timer.
So I refined the design in my head. In the end, I had a few goals for the project:
- I wanted to use a rotary encoder as the interface: it seemed much more natural than stabbing up and down with buttons.
- I wanted to use a small LCD screen in the project: I’d never worked with one, and it seemed like the simplest UI for the project. Also, there was a fun design challenge in fitting clear UI into 16×2 characters.
And that seemed like a starting point.
Building the First Version
There were four unknowns in the project, which roughly corresponded to the four milestones in building it:
- working with the LCD screen
- working with the rotary encoder
- interfacing with the camera
- writing a timer routine
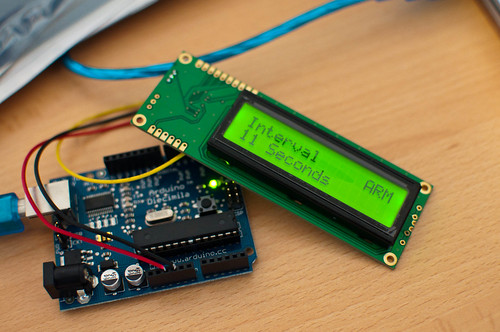
I began at the top. I chose to work with a Serial interface to the LCD – one pin instead of seven seemed like a good trade-off, and it was a tiny bit easier to get started with. Quite soon, I had a UI displaying on the screen:
This felt like a huge leap. Somehow, making rudimentary computer graphics in tools like Logo or Processing had never captured my imagination – perhaps because I felt I ought to be able to do that. Working in a medium I was very unfamiliar with as a developer (but saw every day in my life) and producing output felt strangely empowering.
Of course, it was made much easier by the Arduino ecosystem, which is ideally suited to glue-programmers like myself. The SerLCD library did a lot of the heavy lifting; I just had to work on the implementation, and some details around making sure I put enough pauses in the serial routine.
Next, I worked on the encoder. This, again, was enabled by other people’s code. Rotary encoders aren’t like knobs – they spin forever, and as they pass a pair of contacts, emit Gray code from a pair of pins. You just have to read that code as it passes a pair of pins, and translate it into up/down signals. It wasn’t long – again, thanks to the magic of copy and paste, primarily – before I had the encoder being read.
I then added some detail to its implementation, where setting the timer past 90 seconds switches the device into minutes, which increment by 1, until it reaches 15 minutes. Why 15? It’s the maximum length of time my camera would stay on without any IR input before it goes to sleep.
Finally, we just need to rig up the IR interface. I was, when I began, ready to dismantle an ML-L3 – but it turned out I didn’t need to go that far.
There’s already an Arduino library for that exact functionality. NikonIRControl takes a single IR LED on a pin, and sends it the same sequence of pulses as the ML-L3 does. So that ended up being fixed in software, rather than hardware.
(In the final version, I replaced it with MultiCameraIRControl, in part because it’s now much easier to make this work with many brands of camera).
Along with the hardware, there was a bunch of code to be written. This was mostly straightforward, although finding the best way to write timing routines was the most complex part of it, and in the end, I relied on the TimedAction library, which abstracts a lot of what I’d tried writing longhand out. The other thing I discovered was the ability to compile multiple files at once into an Arduino sketch – available through tabs in the IDE. This helped a lot with clarity.
Really, though, the code is a lot of other people’s libraries or examples, all glued together with some UI and specific functionality on my part. That is the sort of code I end up doing a lot of: gluing other things together.
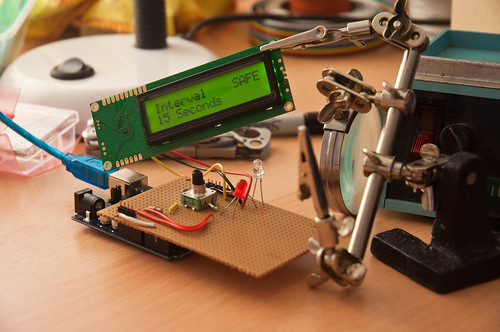
After a few months of the odd evening here and there, I had the whole thing working on a breadboard. The next thing to consider was packaging it up. I made a small shield out of stripboard and mounted it on top of my Arduino mini: a connector jack for the LCD, the encoder and LED soldered into the stripboard, and a battery pack to prove that the USB cable wasn’t doing anything.

That was the first working version. I put a short video on Vimeo. Later in the year, I’d take it to Cornwall with me. There, I shot this 30-minute timelapse:
That really proved it worked: not just the electronics, or the software, but the intent. The goal was not making electronics; the goal was making a timelapse video, which the electronics enabled. And here we were: a timelapse video.
Of course, it wasn’t finished.
My friend Matt Brown saw an early verison of this, and said that it needed to be in some kind of sturdy, industrial black box. And he’s right, really. Something rigged up on your desk on a breadboard is nice, but it’s not finished. Frankly, that dangle of a shield hanging from my lens was nowhere near finished either.
There is value in just doing something, but there is also real value in finishing it. That doesn’t mean selling it, or productizing it, or anything as over-the-top like that. Just get it into a stage where somebody else might recognize it for a thing.
So I started thinking about how to package it, because that would be what really made it a thing, and not just a tangle of wires.
Packaging
The limiting factor on packaging was the LCD screen. I was using a Serial LCD, and the serial componentry was hanging off one edge, extending the length of its PCB. I should have probably used a seven-pin LCD interface, but instead stuck to the serial interface. I took a regular seven-pin LCD, and used this Sparkfun Serial Backpack to convert it to serial whilst taking up less space.
Next, I decided there was no point running it from a full-size Arduino, so bought a Pro Mini, and set about re-installing the code there.
Of course, that meant flashing the Pro Mini, and rigging the whole circuit up on a breadboard, checking it still worked, before moving to a custom circuit.
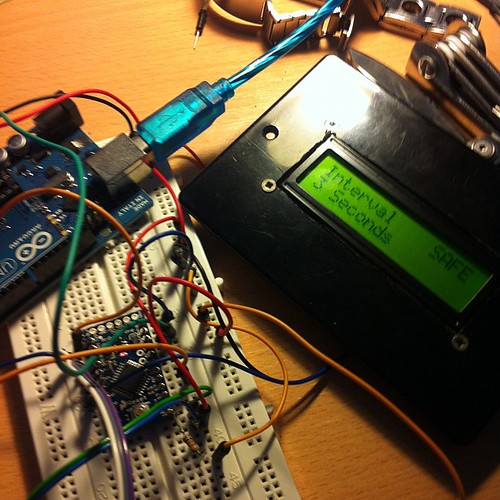
With that done, I made a stripboard for it. (Yes, I keep using stripboard, because it works for me. I don’t know much about PCBs or Eagle, and that would mean this thing was never going to get finished). I would mount the Pro Mini in the middle of this stripboard, and then attach components around it, breaking the tracks where appropriate, to make a stripped-down board.
Crucially, I didn’t directly solder anything other than the battery jack leads. Rather, I put female header sockets onto the board, for the Pro Mini and all the components. Then, I attached the components with hires ending in male headers. That way, I could remove/install componentry easily, and also remove the Pro Mini easily to reflash it with new software. This turned out to be one of my smarter moves.
Finally, there was the matter of the box. Probably my weakest point: I am somewhat clumsy and useless with my hands. Also, I don’t really have any workshop facilities, so drilled the holes for power and encoder, along with the hole for the LCD, with files and a Dremel-a-like. This made a horrendous, ragged mess, and I envy people with CNC facilities or a decent mill. I did use my Dad’s workshop to mount the LCD, which means it at least got some counter-sunk, well drilled holes. Oh, for a pillar drill.
Finally, I just had to piece it together, testing the final version of the code, and plugging components in one at once.
It is strange to say “remarkably, everything worked” so much, but hardware is so strange and fincikity I always expect it not to. Also: I was aware throughout how out of my depth I was, and yet I always bobbed back to the surface.
Squeezing the box shut, the serial backpack on the screen impinged a bit on space, but careful board and battery placement made it shut. And that was that: a working, solid box, that did one thing, with software I’d written and hardware I’d made. More to the point: it was finished.
Finishing and Thingness
This project taught me a few values.
I discovered with this project is the way that Arduino reminds me of Rails: it directly values productivity of the designer/developer, and you pay for that convenience. This project could have been made out of discrete components, or out of a much simpler AVR chip, but it’d have taken me a lot of knowledge and experience. I pushed all the complexity into software, and embraced the Arduino platform. So it may have cost me £20 for the Uno, and about that for the final Pro Mini, as opposed to a few pounds for a bare microcontroller – but I saved myself effort. Still, it’s worth remembering that these solutions are in turn made out of other existing hardware, and that one day, that might be a better solution.
The project taught me the value of thingness: of completing something so that it’s an artefact other people can recognise and identify. The box-with-a-lid is a huge part of that. It stops it being a bunch of wires, something I explain as “an Arduino doing X”, and it becomes an Intervalometer. It becomes a thing.
And finishing is hard. You think software, or electronics is hard? Making a box chewed me up and spat me out. It’s not too hard to make the ragged, ugly holes I did, but gosh, I’d love the precision and experience to not have scratches from skittering milling bits, or the ragged holes around the LCD. Not to mention the entire rebuild of the project necessary to get it small enough to fit into aforementioned box. It reminded me, in the tiniest way, of Nick Foster’s lovely post about the difficulties of making:
It’s now simple for a couple of fairly inexperienced guys to feasibly produce products for sale, which is fantastic, but let’s take a critical look at a few of these products. How many of you have invested in a cool thing on Kickstarter only to receive constant emails about how expensive tooling is, or how hard it is to source PSU’s, or how the team massively under-budgeted the production? There have been many projects which simply ground to a halt because the Matter Battle was just too tough, before we even get into the debating the dubious legal position of these devices (CE mark anyone?)
Foster is talking about manufactured products, of course, which I’m not; I’m still much earlier along the curve. But Matt Brown’s point, a year ago, to make sure I completed it, not just leaving a pile of wires sticking out of a breadboard, was a challenge I felt it worth rising to – and I’m glad I did.
Perhaps most importantly, though, it reminded me of the huge value of making something you saw in your head. It’s vastly rewarding to make an idea that you originated; to solve a problem that you yourself had. I’ve always found that I learn new things better when I have a reason to. Every programming language I’ve tried to learn without something I myself wanted to build with it – I got nowhere. The second I have an itch I need to scratch, I’ll bat through tutorials and understand them, not to mention start trying to implement that thing as soon as I can.
This, I think, is hugely important. It’s why I think an important part of learning to code – for kids, or for adults – is achieving something you wanted – or needed – to do. It’s vital to understand that making, in software, hardware, or materials, is something you do unprompted, to solve problems, and not always knowing where the journey will take you. You don’t just implement rote linked lists, or bubble sorts, or debounce circuits; learning from examples is important, and often all one can do to begin with, but it’s not what the work is about. To learn to make things, you have to Make your own Things. You have to travel a complete path. It doesn’t just make the end more rewarding: it makes the whole journey more rewarding.
I wonder if that’s why a lot of Arduinos are in desk drawers, an LED wedged into pin 13: the platform is exciting and interesting, but there was never an itch. When that itch arises, take that board out of the drawer and scratch it. It is difficult, but it is within your abilities, and you will learn a lot. I did.
-
"Finish Weekend helps you get it done. Come finish those projects you've put off to the side. Maybe you just need a bit of web help, a logo, or some code written. We'll help you finish." Heartily approve. I could do with a lot of these.
Ugly Games are Finished Games
25 March 2009
Matthew Wasteland’s writing is always worth a read, and I really enjoyed The Madeleine in Eight Bits recently. One quotation from the comments thread, though, got me thinking:
That was an interesting article. I was playing the indie game “Don’t Look Back” today and although I enjoyed it couldn’t help but wonder if it really needed to be so blocky. If it couldn’t have expressed it’s themes without the old school affectations.
This coincided with reading Leigh Alexander’s Video Game Hipsters, considering the convergence of “indie” and “lofi” viewed through a lens of cultural knowing.
And this all got me thinking about the lo-fi aesthetic, and “programmer graphics”, and “ugly” games.
Because, to respond to the commenter on Magical Wasteland, I’m not sure how “old school” its affectations are. Yes, it has a retro look-and-feel, and a simple mechanic (not to mention an old-school difficulty curve). But there’s something about it that’s incredibly next-gen to me: it was made by one programmer.
Now, of course, once upon a time, all games were made by one programmer; there’s nothing new about bedroom pgoramming. But what’s truly modern is the distribution: that one game, made by one programmer, already has a huge potential audience; it plays on any browser, and can be played anywhere in the world, at any time.
“Next-gen”, for me, exists at two ends of a spectrum. At one end of the scale, it is 1080p at 60fps, complex shaders and normal mapping, realistic cities, licensed soundtracks, multi-million dollar marketing budgets.
And at the other end, next-gen is empowerment. Making games is easier than ever before. And not just the programming part – the “making games on your own computer” part of the equation. I mean making games that other people can play. Flash is a wonderful tool, readily available (because let’s face it, how many Flash developers have – or at least, start out with – a legal copy of Flash CS4?), powerful, and it’ll work a) on anything and b) anywhere. The barrier to entry is lowered by better tools, higher level languages, and more powerful clients that mean you don’t have to optimise so much; but the real magic is that Kongregate and similar portals have lowered the barrier to distribution.
I think that the reason it appears blocky and crude is so that it could be in the world.
Matt‘s T-shirt stands as a point of reference: “Get excited and make things“. And: make things that are in the world. Applications I can use, t-shirts I can wear, games I can play. If you’re no good at graphics, maybe a pixellated look is all you’ve got time for – but is that enough to make your point? Because if it is, get that game into the world, watch the feedback, make another. Don’t bog down the ideas with asset workflows.
Right now, the predominant aesthetic in indie isn’t just a memory-saving exercise, or a nostalgic tip of the hat to the games we learned from. Yes, it is definitely both of those things, but to my mind, it’s more important that it’s a way of lowering the barrier of getting ideas into the world. Because until it’s a game I can play, it’s nothing.
The most significant change is not the better tools, it’s the better distribution. Compare XNA to the Net Yaroze. The idea of a home console you – as a consumer at home with appropriate skills – could actually make “real” games on was remarkable, at least to me. But what about a console where not you can not only make “real” games, but also sell them, and distribute them to every living room in the world? That’s what XNA Community Games is offering.
That, right there, is your “next-gen”. That’s a service crying out for games to be built for it, so they can be played by anyone. And if that means we take a hit on the art, then so be it. Ugly games may not be great sellers, or to everyone’s tastes, but they are a great way to get more games into the world. And who knows: some of those games might not be pixellated, 8-bit throwbacks. The more you do something, the better you get at it; a year of low-fidelity, two-week games, might make that blockbuster a year later. Look at how Blurst prototype. Look at Gregory Weir’s game-a-month. Even if the games they’re making are not always great shakes, the experience they’re gaining by practicing their craft in such a condensed, rigorous, and demanding manner is far better than a year spent making brick textures for a game that will never, ever, be fun.
The way games get better is if there are more of them, and I’ll do anything to ensure we get more games in the world, that programmers, designers, and artists can make more games, not fewer. If that means resorting to “old-school affectations”, or “programmer graphics”, or any other synonym for ugly: so be it. Yes, the “retro” aesthetic is, I’m sure, as much a trend and aesthetic decision as it is a conscious choice – but it’s not just videogame hipsterism; it’s a pragmatic choice made by those not just interested in making things, but making real things.
More games in the world. And, over time, one would hope: more good games; more important games; more significant games; more remarkable games. Not all of them will ugly, but they’ll be better for the more games that have gone before them. And so, to Terry Cavanagh, and all those like him, I say: keep going.
You keep going, and I’ll keep playing, whatever your games look like.