Knitting

24 October 2013

E3136546caea11e2928c22000a9f3092 7

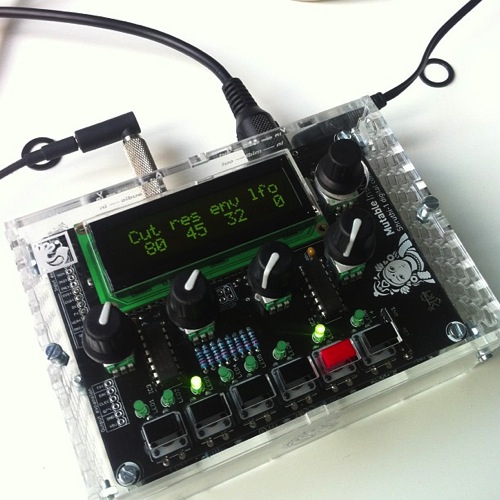
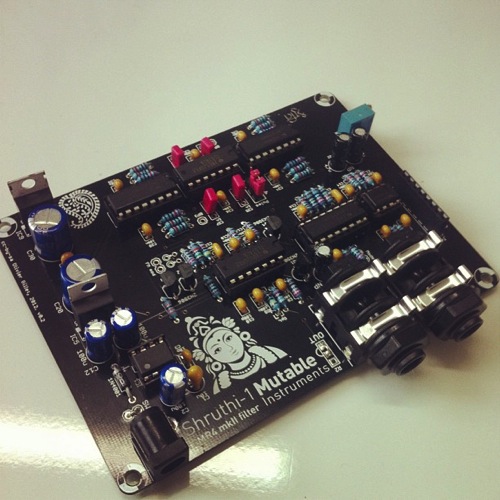
I built a synthesizer this year: a Mutable Instruments Shruthi. I didn’t design it or invent it; it was designed by Olivier Gillet, who released it in kit form. It’s not very expensive – about £150 with the case as well.
3acfbaf8c84011e296c422000a9e0891 7

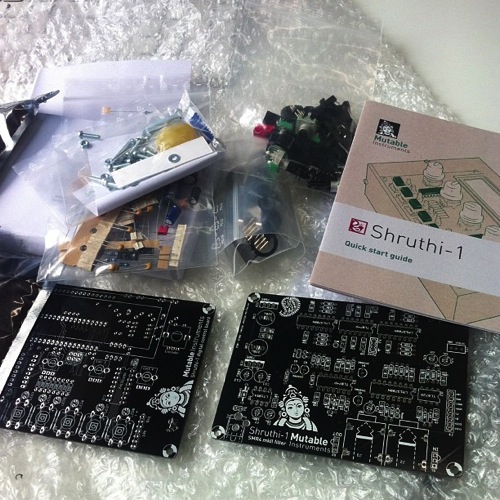
It arrived in a few plastic bags, and I also ordered the lasercut enclosure. And then, I spend a few happy afternoons putting it together.
92006200ca0c11e2b04622000a1f9be0 7

All it required was moderately competent soldering, the ability to follow instructions, and patience. In that regard, it differed little from building Lego, much like I did when I was small. And for the seven or eight hours it took to build, I was lost in my work: entirely happy, paying care and attention to things being made with my hand – occasionally taking out the multimeter to check I hadn’t fluffed a joint.
D34ab69ccada11e2a95722000a9f09e9 7

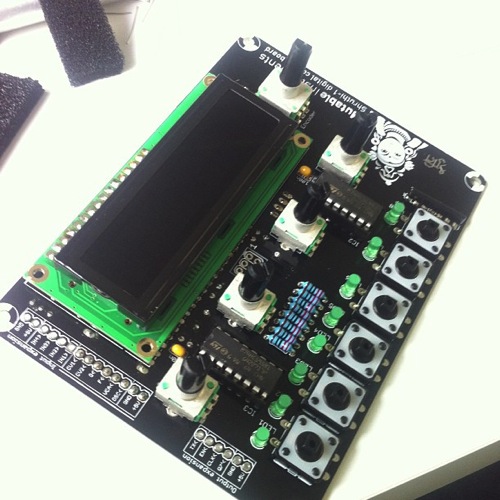
It’s a lovely instrument, with a really interesting sound. It’s a hybrid analog/digital synthesizer: digital oscillators and envelope, but analog filters. The filter is the bottom of the two PCBs, and there are lots of different ones available, for builders looking for different sounds.

Because of that weird structure, it’s not quite like your average analog monosynth. Yes, it can do that – but it also has all manner of interesting digital oscillators, not to mention wavetables (and custom wavetables if you want it), which you can step through with an LFO and… you get the picture. It has some really fat, interesting sounds; a bit like an ESQ-1. But there’s not much on the market like it – and nothing that sounds like it for less than about three to four times the cost.

2cc3cb36cae111e2b36722000ae90e0a 7

It went together fairly smoothly, with only one error that came down to forgetting to completely solder in an IC socket. I mounted it in its case, and added two small switches – one for power, one to swap between two- and four-pole filters.

It’s hugely satisfying to make noises and music with something you’ve built with your own hands. And, though it’s just assembly, there’s a degree of craft going on; care and precision, using tools. That practice has definitely fed into the electronics I’ve constructed myself this year.

What I Talk About When I Talk About Knitting

I’ve characterised this sort of work recently as both whittling and knitting. Something to do with my hands, to empty my head, often between projects.

I think there’s value to just going through motions – what a martial artist would call a kata. It’s why I work through exercises on exercism even after I’ve hit a working solution; why I worked through the Ruby Koans even though I know the language. They’re both warm-ups and refreshers; it is good for the hands to go through motions before they start real work.

It reminds me of watching my Mum knit; she can knit during almost anything. She likes the things she makes, but I’m pretty sure there’s also just a habit of having something to do with one’s hands. It doesn’t always have to be challenging, or harder than last time. It has to be familiar, expected, calming. Progress, learning comes out of repeating the straightforward, just as much as it comes from trying new things. Craft is something to be honed as well as practiced.

A couple of months back, I left a theory-heavy conference session with an urge to make something, anything with my hands – just to offset a slight feeling of impotence that came out of lots of ideas being discussed without implementation. “Whittling for the soul,” I called it at the time.

The Shruthi sounds good, but it felt it’d shine with some effects – a shimmer of delay, or maybe some distortion.

It turns out guitar effects pedals are not that hard to build. This week, between some projects, I did some more knitting.

The Delay Box
Cf44ec36327a11e3aca722000ab7858a 8

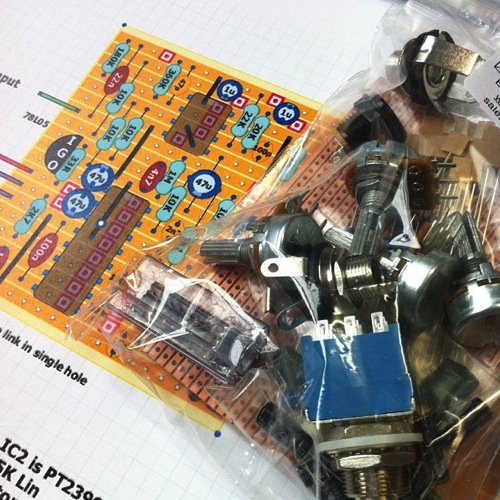
There’s a huge culture, it turns out, of building your own effects boxes – the schematics of existing boxes are reverse-engineered and shared by guitarists on forums, and slowly they piece together PCBs or stripboard layouts. I got a bit lost in Tagboard Effects. But in the end I settled on this delay pedal, which happened to be available in kit form at Bitsbox (a favourite supplier of mine).
641c7510337311e3aa4422000ae90e71 8

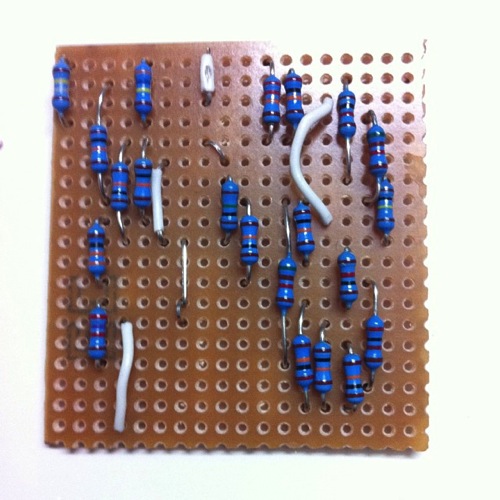
Again: I’m not an electronics engineer; I can piece things together, and have worked out a few little boards to package Arduino projects. This layout felt within my grasp – with hindsight, it was perhaps a bit ambitious for a first board.
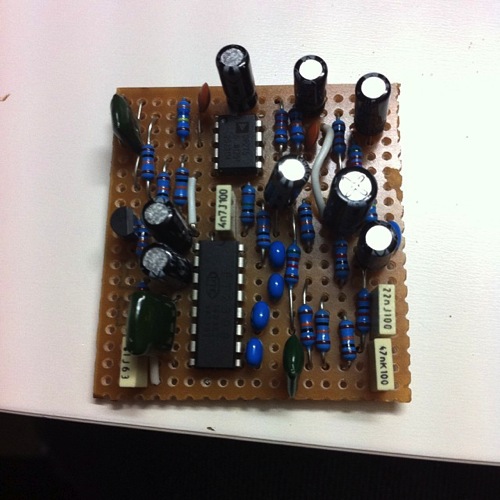
7deb1e92337311e3a03a22000a1fbd56 8

It took a handful of hours to put together the board, working through the layout, patiently cutting and linking the stripboard. I’m not that proud of the soldering on this, although coming back to it later, it’s not too bad.
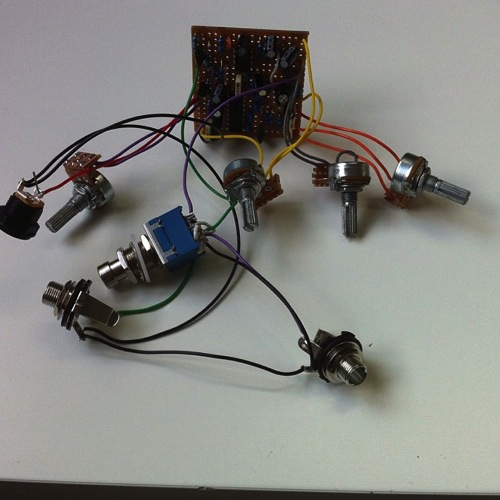
7e8ac88e369811e389b122000a9f18c4 8

Once the board was populated, I started work on the offboard wiring: rigging potentiometers to little breakout boards, linking up the jack leads and DC socket. Next time, I’m going to do this once the components are in the box – I ended up with a correct circuit, but by god it’s a tangle.
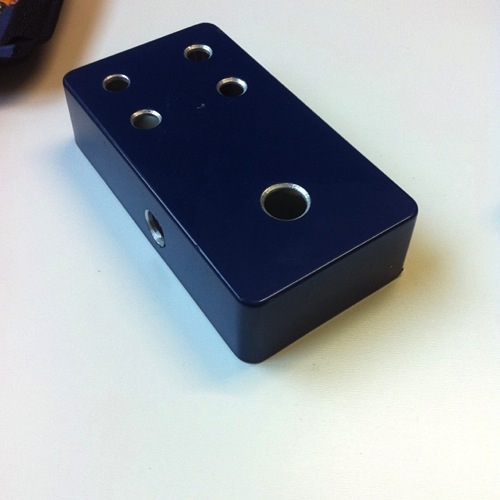
2b089d9a370511e398b622000a1fbd3a 8

Of course, a stompbox is nothing if it’s not in a box. So I sat down with a Hammond 1590B, a unibit, and a carefully laid-out template in Illustrator, and got drilling.

I’ve said it several times: boxes will chew you up and spit you out if you’re not careful. I did a reasonable job here – only one hole too large, and I could have been more generous with the spacing. Fitting everything inside was fiddly and tight – I was convinced everything was going to short out. That hole I cut too large led to internal space being cramped. And yet: somehow, I slotted it all in, screwed it tight, jammed the back on.

(It’s worth noting: Hammond enclosures, especially these pre-painted ones, have a great feel to them).
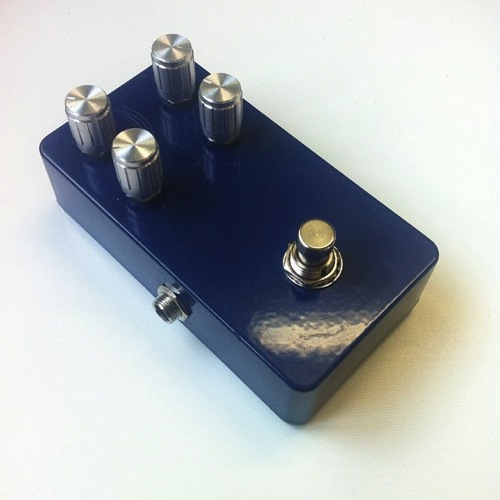
61c84cae3cb411e3b0d822000ae80177 8

A few silver knobs, and the box was complete. The delay worked first time, and sounds delightful – not quite an analog tape delay, but not a perfect digital shimmer; just a hint of degradation as it tails off. Fiddling with the delay time whilst sound’s going through leads to lovely pitch-shifting, and it begins to oscillate and feedback really nicely in the right circumstances.

It didn’t work for a while – and then I discovered the box was fine; it was my jack lead that had sheared internally when I wasn’t looking. A new jack lead, and my guitar was shimmering and dancing away.

Yes, it was just assembly. But it was more than that, too. I refined my manual soldering skills again; I spent some time away from the screen, instead inhaling the delightful smell of solder fumes; I continued to level up at building enclosures – I think this was the most refined one yet, and my first in metal. A really nice artefact.

And again: the fiero of making sound, making music, with a thing you put together yourself.

It was a good piece of knitting in every sense.

I think this type of work is important. It’s easy to spend time learning new things, and pushing ourselves – but it’s equally good to spend time in a relaxing, comfortable space, and enjoy the act of executing well. Craft is not always about the new: it’s also about being able to repeatedly execute quality. Which is why making a simple thing well, is good for the soul.

And an added bonus: slowly, I’m heading back towards making types of music I’d not considered, on instruments and devices I’ve made myself. Next on the knitting list: a fuzz pedal or two, to be built when the next project is over. Or perhaps sooner, if my hands get itchy.
  • "What did The Hustle™ accomplish? I gained weight. I wasn’t spending enough time with my (now) wife. I felt like shit. I began to resent my work, and the work I was producing clearly wasn’t my best. I started cutting corners. I went from a mindset of shipping with quality and integrity to “when is this going to be over?”" I've almost never worked like this – but every time I have, it's always been as terrible as I've suggested it will be beforehand. Mainly on the software end of things, but not always. And the hustle is short-term thinking: the long-term damage is usually so much worse, including, but not limited to: technical debt, RSI, ill health, weight gains, emotional exhaustion, damage to relationships, friendships, and family. I am not only convinced that nothing is worth that; I know it.
  • Really excellent technical article on the development of Novation's Launchpad S. It's not that remarkable a product in many ways, but this is a super-detailed post about some of the thought and improvements that have gone into what looks, on the surface, like a most incremental upgrade – but is in fact surprisingly comprehensive and affects many things at low levels. Really clear, well explained – as is the rest of Focusrite's engineering blog.
  • "I think recognising this – when there is a path from a crisis that involves risk but rewards you hugely – with something you wouldn’t have imagined, is at the very heart of design. It’s certainly an incredible feeling when it works, when the judo-flip flows just so, and you end up somewhere brilliant." Yeah. I really, really need to trust that more when I feel it.
  • "Though adept at mathematics and engineering science, his inventions were all human-centred and focused on the experience and enjoyment of the user. He abandoned his design of a steam motorboat engine, for example, because once he had developed it to rival diesel power it lost its suppleness and "was not a nice thing any more". His car suspensions and the cycle developments were entirely aimed at providing a superior experience for the user. He was very taken, through his association with Bridgestone, with the Japanese sense of the "spirit" of an artefact, reflecting its origins and the care with which it was made. He liked the idea that by seeing and using something one can detect this "spirit", which fitted his own conviction that manufacture and industry are morally rewarding. "Man should make things … Make a profit, of course, but don't take the money gain as the prime judgment."" Great paragraph from this obituary of Alex Moulton.
  • Wonderful article about Hackney – and, specifically, a natural history of the borough as it is right now. The history of social housing throughout the area is particularly interesting; also, I found the distinction between "gentrification" and "yuppification" useful. Ignore the title – it is a meaty piece, with about 2% of it being about hipsters.
  • "…if any one of the participants at the meeting starts to deviate away from the subject, repeat themselves or get a little carried away with their topic, the "Scrum master" presents them with the baseball cap to wear – the idea being to "cap" the conversation at source! This indicates that the person presented with the cap is now prohibited to speak until asked to contribute again, or until the cap is passed to someone else during the course of the meeting." Iiinteresting.

I’ve been making a lot of things recently, both at work and at home. And as a result, I’ve been having to buy tools.

Not a lot, but a steady trickle: discovering I need one of these, or one of those. A box of screws or bolts here; some wire there; a different kind of this to fit a particular need.

I’m trying to artificially acquire odds and ends.

This is hard. What, I think, I’ve been needing is a workshop.

But you can’t buy a workshop. A workshop isn’t a set of tools in a room.

It’s everything else, as well: offcuts; spares; old bits of wood; weird bits of plastic with strange holes in; broken things with one useful part to be cannibalised; hand-made jigs that fit particular things.

There is no shelf in B&Q or Maplin marked “this, that, and the other“, and yet that – more than anything else – is what I’ve been needing recently.

You can’t buy leftovers, spares, or “just the right thing”.

And given that, I think a workshop isn’t measured in the volume of tools it contains, the number of shelves, or the lengths of its benches.

I think it’s measured as a duration. A one-year workshop. A five-year workshop. A ten-year workshop.

Ten years of making things, and ten years of all the entropy that goes along with that: spares, duplicates, improved versions of things, swarf, offcuts, and thingummys.

When you view it like that, it’s no wonder I’m always finding new things I’ll require. I’ve only got a baby workshop (and let’s face it, the tools are in a closet and I’m drilling and sawing things on my dining room table – it’s hardly a workshop, is it?)

But babies grow up.

And it’s a reminder why, when I visit my parents, I can almost always find the bits and bobs I need, or the right tool for a job, or a part I didn’t even know the name of – because there’s a thirty-year workshop waiting for me.

  • "So, given this [zero-button, move and look] interface, whence interactivity in Dear Esther? I say: from an understated but deadly-precise sense of attention design through spatial design.

    You walk along the beach; a path goes up the bluff, another along the strand. You go one way or the other. There are no game-mechanics associated with the choice, and a plot-diagram analysis would call them "the same place" — you can try either, back up, and go the other way. But this misses the point. Precisely because the game lacks keys, switches, stars, and 1ups, it has no implicit mandate to explore every inch of territory. Instead, you want to move forward. Backtracking is dull. Worse: given the game's sedate walking pace, it's slightly frustrating. (They left out the run button for a reason, see?) Moving into new territory is always the best-rewarded move, and therefore your choice of path is a choice. You will not (unless you thrash hard against the game's intentions) see everything in your first run-through." Cracking writing about immersive, environmental storytelling in Dear Esther, and why it's clearly a game.

  • "…he still remembers his frustration at encountering "sliced-up ghettos of thought" – sculpture, architecture, fashion, embroidery, metalwork, product and furniture design all in separate departments – "which I don't believe are absolute. It's just the way we categorise things and the way we chose to educate people."" Quite excited to see the Heatherwick show.
  • "Super-simple baseline .mobi templates. Here ya go."
  • It's basically a satellite that's an external Android peripheral, and they're chucking it into space with a phone attached. Impressive.
  • "The problem with ideas ís, the idea is often simply a way to focus your interest in making a work. The work isn't necessarily, I think-a function of the work is not to express the idea…. The idea focuses your attention in a certain way that helps you to do the work."
  • "This is just an image dump of marvel approved stills and screenshots of my work on the film. I'll do a proper post soon – this is a fraction of the work – But I had the distinct pleasure of working with Cantina Creative, leading the design of the glass screens for the Helicarier in the Avengers. I also led the design and animation of the all new and upgraded Mark VII Hud…

    Included are some partial explanations of how the HUD diagnostic functions
    Variations of it in 'all clear' mode, and a 'battle mode', after the suit has suffered damage and new windows have popped up to show depleted weapon stores and hazardous environmentals and general.

    The flight menu was designed with input from an A-10 Fighter Pilot. I like to keep my stuff accurate.

    I start all designs on paper so I included some ideas for the dock icons. In the final icons, the more detailed versions show system status based on the way they animate."

    Lots of lovely detail in the work on all the fictional UI in the Avengers – looking forward to it being unpacked.

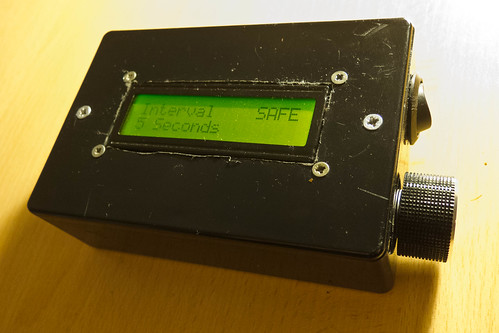
The black box above is an intervalometer to work with Nikon cameras (specifically, any cameras that work with the cheap ML-L3 remote). It has two external controls: a power switch and a knob. You rotate the knob to choose the interval period on the screen, and click it in to arm the intervalometer. Clicking it again and briefly holding it until the screen lights will disable it.

Which sounds simple enough, I suppose. I mean, it’s simple to explain. But when I began, I wasn’t even sure if I’d be able to make this – which was part of the adventure.

My commit messages tell me I’ve been working on it for over a year. It’s not, to be honest, a year-long project; it’s just how it came about, scraped together in moments between work, and I wanted to write some notes on the project – both what it is, and what I learned from it.

The Design

Like many of my technically-savvy peers, I had an Arduino in a desk drawer. I’d used it for more than just making an LED blink – a few little experiments in serial communication – but I’d not exactly exploited its full capabilities.

One day, I had a thought: I wanted to experiment with time-lapse photography, and had a small IR remote for my camera. Perhaps I could make something computer-controller to enable this? Not a full-size computer, that’d be ridiculous. But I could perhaps make something with a small microcontroller – like my Arduino – wired into a spare remote, firing regularly.

That smelled like it was within my reach: a little user interface and a timer.

So I refined the design in my head. In the end, I had a few goals for the project:

  • I wanted to use a rotary encoder as the interface: it seemed much more natural than stabbing up and down with buttons.
  • I wanted to use a small LCD screen in the project: I’d never worked with one, and it seemed like the simplest UI for the project. Also, there was a fun design challenge in fitting clear UI into 16×2 characters.

And that seemed like a starting point.

Building the First Version

There were four unknowns in the project, which roughly corresponded to the four milestones in building it:

  • working with the LCD screen
  • working with the rotary encoder
  • interfacing with the camera
  • writing a timer routine

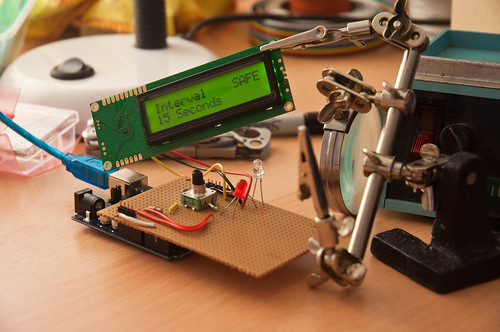
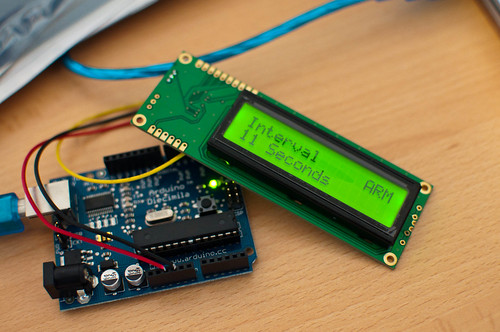
I began at the top. I chose to work with a Serial interface to the LCD – one pin instead of seven seemed like a good trade-off, and it was a tiny bit easier to get started with. Quite soon, I had a UI displaying on the screen:

This felt like a huge leap. Somehow, making rudimentary computer graphics in tools like Logo or Processing had never captured my imagination – perhaps because I felt I ought to be able to do that. Working in a medium I was very unfamiliar with as a developer (but saw every day in my life) and producing output felt strangely empowering.

Of course, it was made much easier by the Arduino ecosystem, which is ideally suited to glue-programmers like myself. The SerLCD library did a lot of the heavy lifting; I just had to work on the implementation, and some details around making sure I put enough pauses in the serial routine.

Next, I worked on the encoder. This, again, was enabled by other people’s code. Rotary encoders aren’t like knobs – they spin forever, and as they pass a pair of contacts, emit Gray code from a pair of pins. You just have to read that code as it passes a pair of pins, and translate it into up/down signals. It wasn’t long – again, thanks to the magic of copy and paste, primarily – before I had the encoder being read.

I then added some detail to its implementation, where setting the timer past 90 seconds switches the device into minutes, which increment by 1, until it reaches 15 minutes. Why 15? It’s the maximum length of time my camera would stay on without any IR input before it goes to sleep.

Finally, we just need to rig up the IR interface. I was, when I began, ready to dismantle an ML-L3 – but it turned out I didn’t need to go that far.

There’s already an Arduino library for that exact functionality. NikonIRControl takes a single IR LED on a pin, and sends it the same sequence of pulses as the ML-L3 does. So that ended up being fixed in software, rather than hardware.

(In the final version, I replaced it with MultiCameraIRControl, in part because it’s now much easier to make this work with many brands of camera).

Along with the hardware, there was a bunch of code to be written. This was mostly straightforward, although finding the best way to write timing routines was the most complex part of it, and in the end, I relied on the TimedAction library, which abstracts a lot of what I’d tried writing longhand out. The other thing I discovered was the ability to compile multiple files at once into an Arduino sketch – available through tabs in the IDE. This helped a lot with clarity.

Really, though, the code is a lot of other people’s libraries or examples, all glued together with some UI and specific functionality on my part. That is the sort of code I end up doing a lot of: gluing other things together.

After a few months of the odd evening here and there, I had the whole thing working on a breadboard. The next thing to consider was packaging it up. I made a small shield out of stripboard and mounted it on top of my Arduino mini: a connector jack for the LCD, the encoder and LED soldered into the stripboard, and a battery pack to prove that the USB cable wasn’t doing anything.

That was the first working version. I put a short video on Vimeo. Later in the year, I’d take it to Cornwall with me. There, I shot this 30-minute timelapse:

That really proved it worked: not just the electronics, or the software, but the intent. The goal was not making electronics; the goal was making a timelapse video, which the electronics enabled. And here we were: a timelapse video.

Of course, it wasn’t finished.

My friend Matt Brown saw an early verison of this, and said that it needed to be in some kind of sturdy, industrial black box. And he’s right, really. Something rigged up on your desk on a breadboard is nice, but it’s not finished. Frankly, that dangle of a shield hanging from my lens was nowhere near finished either.

There is value in just doing something, but there is also real value in finishing it. That doesn’t mean selling it, or productizing it, or anything as over-the-top like that. Just get it into a stage where somebody else might recognize it for a thing.

So I started thinking about how to package it, because that would be what really made it a thing, and not just a tangle of wires.

Packaging

The limiting factor on packaging was the LCD screen. I was using a Serial LCD, and the serial componentry was hanging off one edge, extending the length of its PCB. I should have probably used a seven-pin LCD interface, but instead stuck to the serial interface. I took a regular seven-pin LCD, and used this Sparkfun Serial Backpack to convert it to serial whilst taking up less space.

Next, I decided there was no point running it from a full-size Arduino, so bought a Pro Mini, and set about re-installing the code there.

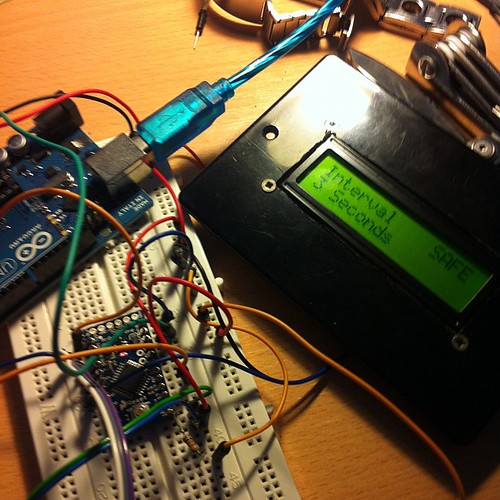
Of course, that meant flashing the Pro Mini, and rigging the whole circuit up on a breadboard, checking it still worked, before moving to a custom circuit.

With that done, I made a stripboard for it. (Yes, I keep using stripboard, because it works for me. I don’t know much about PCBs or Eagle, and that would mean this thing was never going to get finished). I would mount the Pro Mini in the middle of this stripboard, and then attach components around it, breaking the tracks where appropriate, to make a stripped-down board.

Crucially, I didn’t directly solder anything other than the battery jack leads. Rather, I put female header sockets onto the board, for the Pro Mini and all the components. Then, I attached the components with hires ending in male headers. That way, I could remove/install componentry easily, and also remove the Pro Mini easily to reflash it with new software. This turned out to be one of my smarter moves.

Finally, there was the matter of the box. Probably my weakest point: I am somewhat clumsy and useless with my hands. Also, I don’t really have any workshop facilities, so drilled the holes for power and encoder, along with the hole for the LCD, with files and a Dremel-a-like. This made a horrendous, ragged mess, and I envy people with CNC facilities or a decent mill. I did use my Dad’s workshop to mount the LCD, which means it at least got some counter-sunk, well drilled holes. Oh, for a pillar drill.

Finally, I just had to piece it together, testing the final version of the code, and plugging components in one at once.

It is strange to say “remarkably, everything worked” so much, but hardware is so strange and fincikity I always expect it not to. Also: I was aware throughout how out of my depth I was, and yet I always bobbed back to the surface.

Squeezing the box shut, the serial backpack on the screen impinged a bit on space, but careful board and battery placement made it shut. And that was that: a working, solid box, that did one thing, with software I’d written and hardware I’d made. More to the point: it was finished.

Finishing and Thingness

This project taught me a few values.

I discovered with this project is the way that Arduino reminds me of Rails: it directly values productivity of the designer/developer, and you pay for that convenience. This project could have been made out of discrete components, or out of a much simpler AVR chip, but it’d have taken me a lot of knowledge and experience. I pushed all the complexity into software, and embraced the Arduino platform. So it may have cost me £20 for the Uno, and about that for the final Pro Mini, as opposed to a few pounds for a bare microcontroller – but I saved myself effort. Still, it’s worth remembering that these solutions are in turn made out of other existing hardware, and that one day, that might be a better solution.

The project taught me the value of thingness: of completing something so that it’s an artefact other people can recognise and identify. The box-with-a-lid is a huge part of that. It stops it being a bunch of wires, something I explain as “an Arduino doing X”, and it becomes an Intervalometer. It becomes a thing.

And finishing is hard. You think software, or electronics is hard? Making a box chewed me up and spat me out. It’s not too hard to make the ragged, ugly holes I did, but gosh, I’d love the precision and experience to not have scratches from skittering milling bits, or the ragged holes around the LCD. Not to mention the entire rebuild of the project necessary to get it small enough to fit into aforementioned box. It reminded me, in the tiniest way, of Nick Foster’s lovely post about the difficulties of making:

It’s now simple for a couple of fairly inexperienced guys to feasibly produce products for sale, which is fantastic, but let’s take a critical look at a few of these products. How many of you have invested in a cool thing on Kickstarter only to receive constant emails about how expensive tooling is, or how hard it is to source PSU’s, or how the team massively under-budgeted the production? There have been many projects which simply ground to a halt because the Matter Battle was just too tough, before we even get into the debating the dubious legal position of these devices (CE mark anyone?)

Foster is talking about manufactured products, of course, which I’m not; I’m still much earlier along the curve. But Matt Brown’s point, a year ago, to make sure I completed it, not just leaving a pile of wires sticking out of a breadboard, was a challenge I felt it worth rising to – and I’m glad I did.

Perhaps most importantly, though, it reminded me of the huge value of making something you saw in your head. It’s vastly rewarding to make an idea that you originated; to solve a problem that you yourself had. I’ve always found that I learn new things better when I have a reason to. Every programming language I’ve tried to learn without something I myself wanted to build with it – I got nowhere. The second I have an itch I need to scratch, I’ll bat through tutorials and understand them, not to mention start trying to implement that thing as soon as I can.

This, I think, is hugely important. It’s why I think an important part of learning to code – for kids, or for adults – is achieving something you wanted – or needed – to do. It’s vital to understand that making, in software, hardware, or materials, is something you do unprompted, to solve problems, and not always knowing where the journey will take you. You don’t just implement rote linked lists, or bubble sorts, or debounce circuits; learning from examples is important, and often all one can do to begin with, but it’s not what the work is about. To learn to make things, you have to Make your own Things. You have to travel a complete path. It doesn’t just make the end more rewarding: it makes the whole journey more rewarding.

I wonder if that’s why a lot of Arduinos are in desk drawers, an LED wedged into pin 13: the platform is exciting and interesting, but there was never an itch. When that itch arises, take that board out of the drawer and scratch it. It is difficult, but it is within your abilities, and you will learn a lot. I did.